The MFA Plugin provides Two-Factor Authentication for GP247 system, enhancing user account security. The plugin supports multiple guards (customer, admin, vendor, pmo...) for flexible user authentication management.
MFA (Multi-Factor Authentication) Plugin for GP247
Overview
The MFA Plugin provides Two-Factor Authentication for GP247 system, enhancing user account security. The plugin supports multiple guards (customer, admin, vendor, pmo...) for flexible user authentication management.
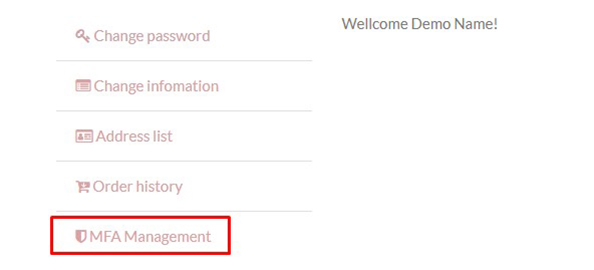
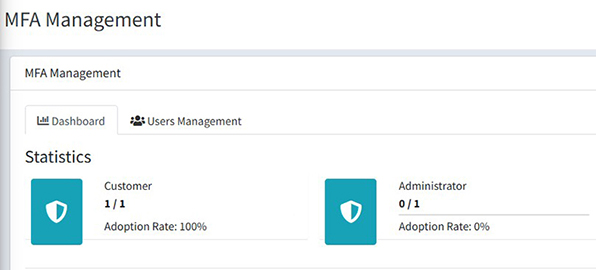
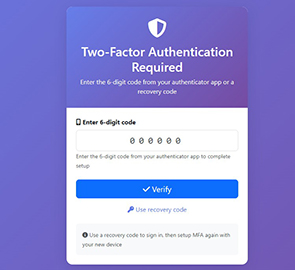
Features
- ✅ Two-factor authentication using TOTP (Time-based One-Time Password)
- ✅ Multiple guards support: customer, admin, vendor, pmo
- ✅ Easy-to-scan QR codes with authenticator apps
- ✅ Recovery codes for device loss scenarios
- ✅ MFA management from Admin panel
- ✅ Usage statistics by guard
- ✅ Optional forced MFA per guard
- ✅ Responsive and user-friendly interface
- ✅ Multi-language support (Vietnamese, English)
System Requirements
- GP247 Core >= 1.2
- Laravel 12.x
- PHP >= 8.2
- Required packages:
- pragmarx/google2fa: ^8.0 or ^9.0
- bacon/bacon-qr-code: ^2.0 or ^3.0
Installation
Step 1: Install dependencies
Add the required packages to your main project's composer.json:
composer require pragmarx/google2fa
composer require bacon/bacon-qr-code
Important: Run this command in the root directory of your GP247 project, not inside the plugin folder.
Step 2: Install the plugin
There are 4 methods to install the plugin:
Method 1: Install via Online Library
- Navigate to "Extensions" in the admin dashboard
- Select "Plugins"
- Choose the "Install from Library" tab
- Find "MFA" plugin and click "Install"
- Click "Enable" to activate the plugin
Method 2: Import zip file
- Access Admin Panel > Extensions > Plugins
- Select the "Import file" tab
- Choose the MFA plugin zip file
- Complete the import process
- Click "Enable" to activate the plugin
Method 3: Manual installation
In case you encounter difficulties importing the zip file (e.g. upload errors, temporary file issues, etc.):
-
Unzip and copy the source code folder to the corresponding directory:
app/GP247/Plugins/MFA
-
Copy the MFA/public folder to the corresponding public path:
public/GP247/Plugins/MFA
-
Access Admin Panel > Extensions > Plugins
-
In the default "Local storage" tab, find "MFA" and click "Install"
-
Click "Enable" to activate the plugin
Method 4: Install from the command line (CLI, gp247 3.x)
Since gp247 3.x you can download MFA from the GP247 library and install it straight from the command line, without opening the admin. Step 1 must be done first (composer require pragmarx/google2fa bacon/bacon-qr-code), otherwise the command stops because the packages are missing. Open a terminal in the website's root folder and run:
# 1) Once per website: register the (free) API License that connects the site to the GP247 library
php artisan gp247:ext-register-license

# 2) Download the plugin from the library and install it
php artisan gp247:ext-install --type=plugin --key=MFA
- Before step 1, make sure
APP_URL in .env is the website's real domain (not http://localhost) — the license is bound to that domain.
- Once installed, the plugin is enabled and caches are refreshed automatically; you no longer need to click Install/Enable in the admin.
- The command checks the requirements declared in
gp247.json (core version, composer packages, required plugins) and stops with a clear message if something is missing (e.g. pragmarx/google2fa or bacon/bacon-qr-code is not installed).
- If the folder
app/GP247/Plugins/MFA is already on the server (copied manually or shipped with the installer), the command installs it in place instead of downloading it again.
- The command refuses a plugin that is already installed. To move to a newer version, run
php artisan gp247:ext-update --type=plugin --key=MFA.
- Append
--json to get machine-readable output (for scripts/CI).
- The post-install configuration steps below (Step 3) still apply.
- More: Installing Plugins & Templates · Command reference.
Reference: Guide to Installing the Extension
Step 3: Configuration
After successful installation, the MFA plugin will appear in the menu:
Admin Panel > System Configuration > Security > MFA
Configuration via config file
To configure the plugin, edit the file: app/GP247/Plugins/MFA/config.php
Default: The plugin is only enabled for the admin guard.
Configuration parameters for each guard:
- enabled:
1 = enabled, 0 = disabled MFA for the guard
- forced:
1 = mandatory, 0 = optional (users can enable/disable MFA)
- model: User model class
- qr_code_size: QR code size (100-500px)
- recovery_codes_count: Number of recovery codes (4-20)
- window: Time window allowance (0-5, recommended 1)
Example configuration:
'guards' => [
    'customer' => [
        'enabled' => 0,  // Disable MFA for customer
        'forced' => 0,
        // ... other parameters
    ],
    'admin' => [
        'enabled' => 1,  // Enable MFA for admin (default)
        'forced' => 0,   // Not mandatory
        // ... other parameters
    ],
],
Note: After editing the config file, clear the cache:
php artisan config:clear
php artisan cache:clear
Usage
For End Users
Setup MFA
- Go to MFA management page:
/mfa/setup/customer
- Scan QR code with authenticator app (Google Authenticator, Authy, Microsoft Authenticator, etc.)
- Enter 6-digit code from app to verify
- Save recovery codes in a secure place
Login with MFA
- Login with username/password as usual
- After successful login, system will require MFA code
- Enter 6-digit code from authenticator app
- Or use 8-character recovery code if device is lost
Manage MFA
- View MFA status:
/mfa/manage/customer
- View recovery codes:
/mfa/recovery-codes/customer
- Regenerate recovery codes: From MFA management page
- Disable MFA: From MFA management page (requires password confirmation)
For Administrators
View Statistics
- Access Admin Panel > Extensions > MFA
- View MFA adoption rate by guard
- See total users and enabled users
Configure Guards
- Enable/disable MFA for each guard
- Force users to enable MFA
- Adjust technical parameters
Reset User MFA
- From MFA management page, admins can reset MFA for any user
- User will need to setup MFA again from scratch
MFA Flow Diagrams
1. MFA Setup Flow (First Time)
┌─────────────────────────────────────────────────────────────┐
│                    User Login Success                        │
└────────────────────────┬────────────────────────────────────┘
                         │
                         ▼
                ┌────────────────────┐
                │  MFA Enabled for   │
                │  this guard?       │
                └────────┬───────────┘
                         │
        ┌────────────────┴────────────────┐
        │ No                               │ Yes
        ▼                                  ▼
┌───────────────┐              ┌────────────────────┐
│  Allow Access │              │ User enrolled MFA? │
└───────────────┘              └─────────┬──────────┘
                                         │
                        ┌────────────────┴────────────────┐
                        │ No                               │ Yes
                        ▼                                  ▼
              ┌──────────────────┐              ┌──────────────────┐
              │  MFA Forced?     │              │ Session verified?│
              └────────┬─────────┘              └────────┬─────────┘
                       │                                 │
         ┌─────────────┴──────────┐           ┌─────────┴─────────┐
         │ No          │ Yes      │           │ No     │ Yes      │
         ▼             ▼          │           ▼        ▼          │
    Allow Access   Redirect      │      Redirect  Allow Access   │
                   to Setup      │      to Verify                │
                       │          │           │                   │
                       ▼          │           ▼                   │
              ┌─────────────┐    │   ┌─────────────────┐        │
              │ Show QR Code│    │   │ Enter 6-digit   │        │
              │ & Secret    │    │   │ code or         │        │
              └──────┬──────┘    │   │ recovery code   │        │
                     │           │   └────────┬────────┘        │
                     ▼           │            │                  │
              ┌─────────────┐    │            ▼                  │
              │ Verify Code │    │   ┌─────────────────┐        │
              └──────┬──────┘    │   │  Code Valid?    │        │
                     │           │   └────────┬────────┘        │
                     ▼           │            │                  │
            ┌─────────────────┐ │   ┌────────┴────────┐        │
            │ Generate        │ │   │ No    │ Yes     │        │
            │ Recovery Codes  │ │   ▼       ▼         │        │
            └────────┬────────┘ │  Error  Set         │        │
                     │          │         Session     │        │
                     ▼          │         Verified    │        │
            ┌─────────────────┐ │            │        │        │
            │ Show & Save     │ │            ▼        │        │
            │ Recovery Codes  │ │    ┌──────────────┐ │        │
            └────────┬────────┘ │    │Allow Access  │ │        │
                     │          │    └──────────────┘ │        │
                     ▼          │                      │        │
            ┌─────────────────┐ │                      │        │
            │ MFA Activated   │ │                      │        │
            └────────┬────────┘ │                      │        │
                     │          │                      │        │
                     └──────────┴──────────────────────┘        │
                                │                               │
                                └───────────────────────────────┘
2. Login Flow with MFA (Already Setup)
┌─────────────────────┐
│ User Login          │
│ (Email + Password)  │
└──────────┬──────────┘
           │
           ▼
┌──────────────────────┐
│ Credentials Valid?   │
└──────────┬───────────┘
           │
    ┌──────┴──────┐
    │ No   │ Yes  │
    ▼      ▼      │
  Error  Check    │
         MFA      │
           │      │
           ▼      │
┌─────────────────────┐
│ User enrolled MFA?  │
└──────────┬──────────┘
           │
    ┌──────┴──────┐
    │ No   │ Yes  │
    ▼      ▼      │
  Allow  Redirect │
  Access to MFA   │
         Verify   │
           │      │
           ▼      │
┌────────────────────────────┐
│ MFA Verification Page      │
│                            │
│ [Enter 6-digit code]       │
│ or                         │
│ [Use recovery code]        │
└──────────┬─────────────────┘
           │
           ▼
┌──────────────────────┐
│ Verify Code          │
│ (TOTP or Recovery)   │
└──────────┬───────────┘
           │
    ┌──────┴──────────┐
    │ Valid │ Invalid │
    ▼       ▼         │
┌─────────────┐  ┌─────────┐
│ Set Session │  │ Show    │
│ Verified    │  │ Error   │
└──────┬──────┘  └────┬────┘
       │              │
       ▼              ▼
┌──────────────┐  ┌──────────┐
│ Allow Access │  │ Try Again│
└──────────────┘  └──────────┘
3. Recovery Code Flow
┌──────────────────────┐
│ User lost device     │
└──────────┬───────────┘
           │
           ▼
┌──────────────────────┐
│ Login Page           │
│ Enter credentials    │
└──────────┬───────────┘
           │
           ▼
┌──────────────────────────┐
│ MFA Verification Page    │
│                          │
│ Click "Use recovery code"│
└──────────┬───────────────┘
           │
           ▼
┌──────────────────────────┐
│ Enter 8-char recovery    │
│ code (e.g. ABCD1234)     │
└──────────┬───────────────┘
           │
           ▼
┌──────────────────────┐
│ Check recovery code  │
│ in database          │
└──────────┬───────────┘
           │
    ┌──────┴───────┐
    │ Valid│Invalid│
    ▼      ▼       │
┌────────────┐ ┌────────┐
│ Mark code  │ │ Error  │
│ as used    │ └────────┘
└─────┬──────┘     │
      │            │
      ▼            │
┌────────────┐     │
│ Login OK   │     │
└─────┬──────┘     │
      │            │
      ▼            │
┌──────────────────┐
│ Redirect to      │
│ MFA Setup        │
│ (Setup new device)│
└──────────────────┘
4. Middleware Flow
┌──────────────────────────┐
│ Request to protected     │
│ route with mfa.verify    │
└───────────┬──────────────┘
            │
            ▼
┌───────────────────────────┐
│ Middleware: Check Auth    │
└───────────┬───────────────┘
            │
     ┌──────┴──────┐
     │ Not  │ Auth │
     │ Auth │      │
     ▼      ▼      │
   Redirect Check  │
   to Login MFA    │
            │      │
            ▼      │
┌─────────────────────────┐
│ MFA enabled for guard?  │
└───────────┬─────────────┘
            │
     ┌──────┴──────┐
     │ No   │ Yes  │
     ▼      ▼      │
   Allow  Check    │
   Access Session  │
            │      │
            ▼      │
┌──────────────────────────┐
│ Session verified?        │
└───────────┬──────────────┘
            │
     ┌──────┴──────┐
     │ Yes  │ No   │
     ▼      ▼      │
   Allow  Check    │
   Access User     │
          MFA      │
            │      │
            ▼      │
┌──────────────────────────┐
│ User enrolled MFA?       │
└───────────┬──────────────┘
            │
     ┌──────┴──────┐
     │ No   │ Yes  │
     ▼      ▼      │
   Check  Redirect │
   Forced to MFA   │
   MFA    Verify   │
     │             │
     ▼             │
┌──────────────┐   │
│ MFA Forced?  │   │
└──────┬───────┘   │
       │           │
  ┌────┴────┐      │
  │No  │Yes │      │
  ▼    ▼    │      │
Allow Redirect     │
Access to Setup    │
       │           │
       └───────────┘
Code Integration
Middleware
Use mfa.verify middleware to protect routes:
// In routes/web.php
Route::group(['middleware' => ['auth:customer', 'mfa.verify:customer']], function () {
    Route::get('/dashboard', 'DashboardController@index');
    Route::get('/profile', 'ProfileController@index');
});

// For admin
Route::group(['middleware' => ['auth:admin', 'mfa.verify:admin']], function () {
    Route::get('/admin/dashboard', 'AdminController@index');
});
Helper Functions
// Check if MFA is enabled for guard
if (mfa_is_enabled_for_guard('customer')) {
    // MFA is enabled
}

// Check if user has enrolled MFA
if (mfa_is_user_enrolled($user, 'customer')) {
    // User has enrolled MFA
}

// Check if session is MFA verified
if (mfa_is_verified()) {
    // Session is verified
}

// Mark session as verified
mfa_set_verified();

// Clear verification from session
mfa_clear_verified();
Directory Structure
app/GP247/Plugins/MFA/
├── Admin/
│   └── AdminController.php          # Admin panel controller
├── Controllers/
│   └── MFAController.php            # Main MFA controller
├── Helpers/
│   └── TwoFactorHelper.php          # Google 2FA helper
├── Lang/
│   ├── en/
│   │   └── lang.php                 # English translations
│   └── vi/
│       └── lang.php                 # Vietnamese translations
├── Middleware/
│   └── TwoFactorAuthentication.php # MFA verification middleware
├── Models/
│   ├── ExtensionModel.php           # Install/uninstall model
│   └── TwoFactorAuth.php            # MFA storage model
├── Views/
│   ├── Admin.blade.php              # Admin view
│   └── Frontend/
│       ├── setup.blade.php          # MFA setup view
│       ├── verify.blade.php         # MFA verification view
│       ├── recovery_codes.blade.php # Recovery codes view
│       └── manage.blade.php         # MFA management view
├── AppConfig.php                     # Plugin configuration
├── config.php                        # Config file
├── function.php                      # Helper functions
├── gp247.json                        # Plugin metadata
├── Provider.php                      # Service provider
├── Route.php                         # Routes
└── readme.md                         # This documentation
Security
Encryption
- Secret keys are encrypted in database using Laravel Encryption
- Recovery codes are encrypted in database
- All sensitive data is protected
Best Practices
- Force MFA for Admins: Enable "Forced" for admin guard
- User Education: Guide users to store recovery codes safely
- Regular Monitoring: Track MFA adoption rates
- Backups: Ensure database is regularly backed up
- HTTPS: Require HTTPS for all MFA pages
Supported Authenticator Apps
The plugin supports all TOTP authenticator apps:
- Google Authenticator (iOS, Android)
- Microsoft Authenticator (iOS, Android)
- Authy (iOS, Android, Desktop)
- 1Password (iOS, Android, Desktop)
- LastPass Authenticator
- Duo Mobile
- FreeOTP
- And many other TOTP apps
Troubleshooting
User Lost Authenticator Device
- User uses recovery code to login
- After login, setup MFA again with new device
- Save new recovery codes
Verification Code Not Working
- Check if device time is accurate
- Increase "Window" value in configuration (recommended 1-2)
- Ensure correct QR code was scanned
Admin Wants to Reset User MFA
- Access Admin Panel > Extensions > MFA
- Find user in list
- Click "Reset MFA"
- User will need to setup MFA again
Support
License
MIT License
Author
GP247 Team
Changelog
Version 1.0
- Initial release
- Support for Customer, Admin, Vendor, PMO guards
- TOTP authentication with Google Authenticator
- Recovery codes system
- Admin management panel
- Multi-language support (Vietnamese, English)



 Plugin