
 Tiếng Việt
Link to product:
S-Cart Multi-Vendor - Detailed Guide
Table of Contents
1. Specific Features2. Vendor Classification
3. Payment Processing Logic for Vendors
4. Installation Guide
1. Specific Features
Customers:
- Manage personal information
- Manage shopping cart, wishlist, comparison list
- Manage order history
- Purchase products from marketplace stores or distributor's own domain
- Support quick purchase of multiple products from vendors
Vendors:
- Have separate admin panel
- Manage products
- Manage banners, categories
- Manage orders
- Update store information
- Create custom content pages (promotions, introductions, etc.)
- Write blogs, news
- Have store on main website (marketplace)
- Can use custom domain for vendor website
- Customize layout and interface of own website and store
- View payment history: total sales amount, received amount, remaining amount
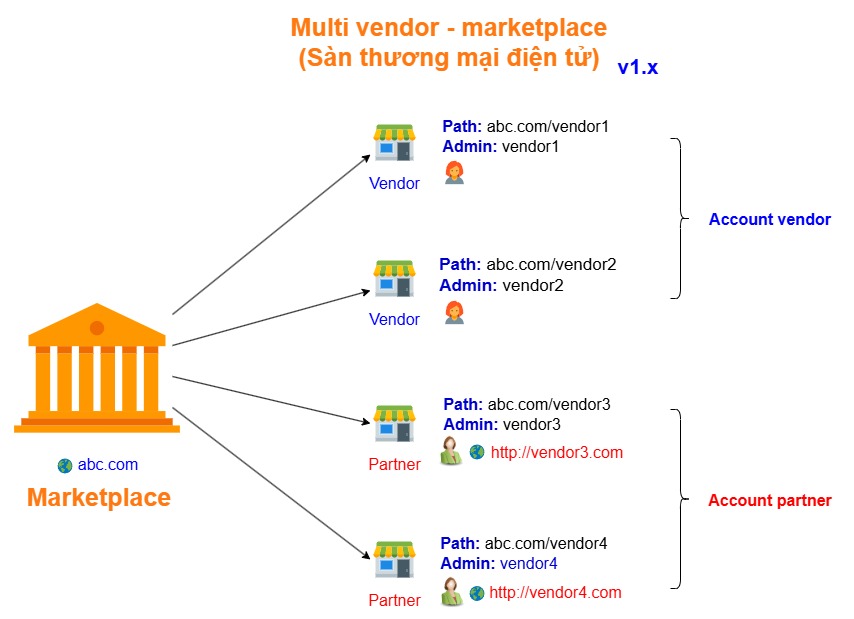
- Have 2 types of vendor accounts: regular account (store only), partner account (custom domain)
Admin:
- Admin account has full authority over the system
- Manage all vendors (including products, orders, domains, etc.)
- Create/delete, change vendor store information
- Create, delete, change vendor login account information
- Configure commission rates with vendors
- Allow/block automatic vendor account registration feature
- Automatic/non-automatic vendor store approval
- Automatic/non-automatic product approval posted by vendors
- Manage history and statistics of vendor payments
- Block/allow domains to access the system
System:
- Always receive new features and bug fixes from GP247
- Have all features of S-Cart ecommerce system: API, multi-language, multi-currency, flexible cart processing, powerful admin group/permission management, news creation
- Free plugin library always updated and supplemented
- GP247 ecommerce community groups (facebook, github) always ready to provide free support
2. Vendor Classification
| Feature | Vendor Account | Partner Account |
| Store on marketplace | Yes | Yes |
| Vendor admin account | Yes | Yes |
| Create custom categories | Yes | Yes |
| Manage products | Yes | Yes |
| Manage categories | Yes | Yes |
| Manage orders | Yes | Yes |
| Update store information | Yes | Yes |
| View payment history | Yes | Yes |
| Create content blocks | -- | Yes |
| Maintenance feature | -- | Yes |
| Store configuration | -- | Yes |
| Custom pages: promotions, introductions, etc. | -- | Yes |
| Own website | -- | Yes |
| Write blog/news | -- | Yes |
Note:
- Admin links: Root admin root-domain.com/gp247_admin
- Vendor admin: root-domain.com/vendor_admin
3. Payment Processing Logic for Vendors
Step 1:
Orders must be in completed status.
Step 2:
Admin accesses gp247_admin/MultiVendorPro/payment, enters payment processing date
- Payment date must be less than current date
- Already processed payment dates will not be processed again
- Orders completed (Step 1) less than or equal to payment date will be processed
Step 3:
- Processed orders will be grouped by currency type
4. Installation Guide
Step 1: Install S-Cart
First, you need to install the S-Cart system. Refer to the detailed guide at: S-Cart Overview
Recommended method - Install via Composer:
composer create-project s-cart/s-cart
Then perform configuration steps:
- Check and configure
.envfile - Generate APP_KEY:
php artisan key:generate - Initialize S-Cart:
php artisan sc:install - Install sample data (optional):
php artisan sc:sample
Step 2: Install MultiVendor Plugin
After successfully installing S-Cart, you can install the MultiVendor plugin in the following ways:
Method 1: Import zip file
- Access "Extensions" in S-Cart admin panel
- Select "Utilities" section
- Choose "Import file" tab and upload MultiVendor plugin zip file
Method 2: Manual installation
- Extract and copy source code folder to directory:
app/GP247/Plugins/MultiVendorPro - Copy public folder to:
public/GP247/Plugins/MultiVendorPro - Access admin and install plugin in "Saved on local" tab
Refer to details: Extension Installation Guide
Step 3: Activate and use
-
Access admin panel:
- Root admin:
your-domain.com/gp247_admin - Vendor admin:
your-domain.com/vendor_admin
- Root admin:
-
Activate plugin:
- Go to "Extensions" menu -> "Plugin"
- Find MultiVendor plugin and click "Activate"
-
Initial configuration:
- Set commission rates for vendors
- Configure automatic registration permissions (if needed)
- Set up product/store approval process
-
Start using:
- Create vendor accounts
- Configure stores and custom domains
- Manage products and orders