


🌐 Language: 🇻🇳 Tiếng Việt · 🇬🇧 English (current) · 🇯🇵 日本語
Tracking code & cookie banner
Introduction
This page shows how to add Google Analytics 4 (GA4), Google Tag Manager (GTM), Meta Pixel and code from other services to your store, then turn on the cookie banner so visitors are asked before the code runs. It is written for site owners without a technical background. After reading it, you can add the code just by pasting IDs, pick the right banner mode and see revenue from your ads in GA4 / Meta.
At a glance
Everything happens on one screen: SEO › Tracking code & cookies. Code runs in a visitor's browser only when its cookie group is allowed.
flowchart LR
    A["Paste IDs<br/>GA4, GTM, Pixel"] --> B["Pick a<br/>banner mode"]
    B --> C["Visitor chooses<br/>on the banner"]
    C --> D["Code runs for<br/>allowed groups"]
- Just paste the ID — the system writes the standard code for GA4, GTM and Meta Pixel for you.
- Each piece of code belongs to a cookie group: Analytics (visit statistics) or Marketing (advertising).
- Three banner modes: Off · Notice only · Ask first. The default is Off.
- Sales events are sent automatically: product view, add to cart, start of checkout, purchase.
- One switch turns all code off when something goes wrong; the code you entered is kept.
ℹ️ Available since: gp247/front 3.12.0 (tracking code, cookie banner); sales events also need gp247/shop 3.13.0
On this page
- Open the Tracking code & cookies screen — who can open it, which store
- Add GA4, GTM and Meta Pixel — where to find the ID, where to paste it
- Add code from other services — Google Ads, TikTok, Microsoft Clarity…
- Turn on the cookie banner — three modes, text, policy page, asking visitors again
- What visitors see on the store — the banner, Cookie settings
- Sales events sent to GA4 and Meta — four events, where to see them
- Switch off all code in an emergency
- Warnings in the admin
- The banner is not legal advice
- Conditions & Rules
Open the Tracking code & cookies screen
The screen is in the SEO menu group, item Tracking code & cookies. The Meta & JSON-LD screen also has a line that links here.

- Only Administrator accounts can open and save it. Code pasted here runs in every visitor's browser, so this permission is not given to other roles.
- Sites with several stores: pick the store in Store being set up. A sub-store uses the root store's values until you change them for that store; click Use the root store value to go back.
- The admin never runs tracking code — you can browse the admin freely without skewing your numbers.
Add GA4, GTM and Meta Pixel
In the Ready-made services block you paste only the ID, not the whole code.
| Service | Field | ID looks like | Where to find it | Cookie group |
|---|---|---|---|---|
| Google Analytics 4 | GA4 Measurement ID | G-ABC123XYZ9 |
GA4 › Admin › Data streams › web stream | Analytics |
| Google Tag Manager | GTM Container ID | GTM-AB12CD3 |
Top of the GTM page, next to the container name | You choose |
| Meta Pixel | Meta Pixel ID | 123456789012345 |
Meta Events Manager › Data sources | Marketing |
- Open SEO › Tracking code & cookies.
- Paste the ID into its field. Don't worry about upper / lower case or extra spaces; the system fixes them.
- For GTM, choose Cookie group of GTM: Marketing if GTM holds advertising / remarketing tags (Google Ads, Facebook…); Analytics if GTM only counts visits.
- Click Save. If an ID has the wrong format, that field turns red and nothing is saved.
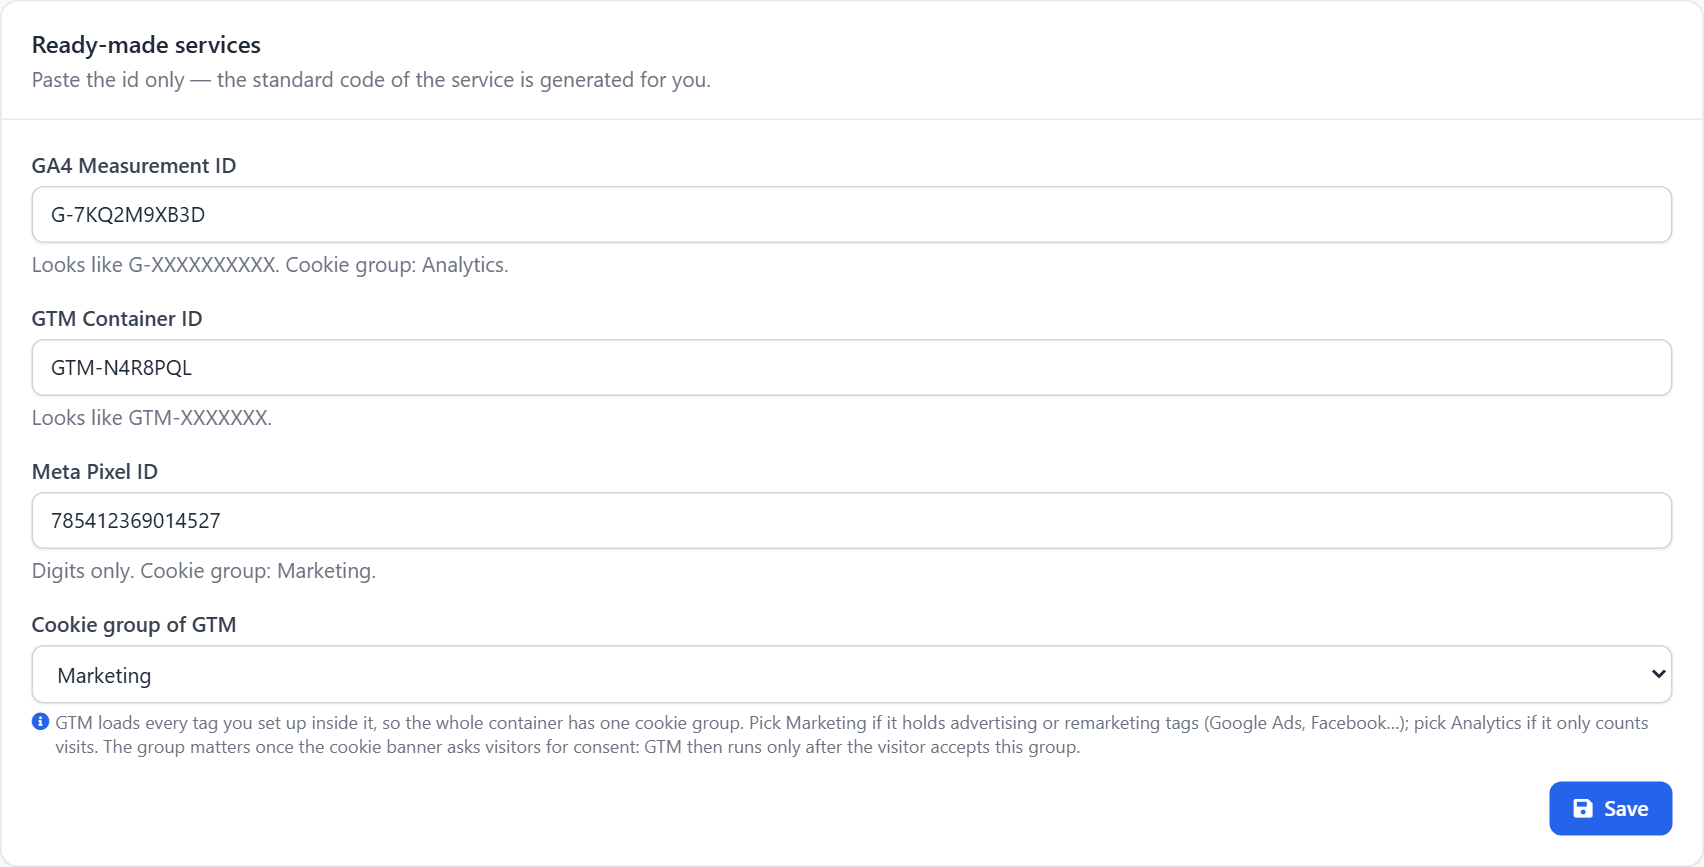
If it worked, open a store page: the code runs straight away when the banner is Off, or after you click Accept all when the banner is on.
💡 Tip: use GA4 or a GTM container that holds a GA4 tag, not both for the same GA4 account — page views would be counted twice.
Add code from other services
The Custom code block is for services without a ready-made field (Google Ads, TikTok, Microsoft Clarity…). Each code block has its own name, place, cookie group and On switch.
- Click Add code block.
- Set a Block name (for example "Clarity") so you can recognise it later.
- Pick the Place the service asks for: most use Inside head; some widgets (chat, reviews) ask for End of body.
- Pick the Cookie group: Analytics for statistics and behaviour; Marketing for advertising, conversion tracking and remarketing.
- Paste the whole code the service gives you, including the opening and closing tags (for example
<script>…</script>). - Click Save code blocks. All blocks are saved together, separately from the Save button of the ready-made services.
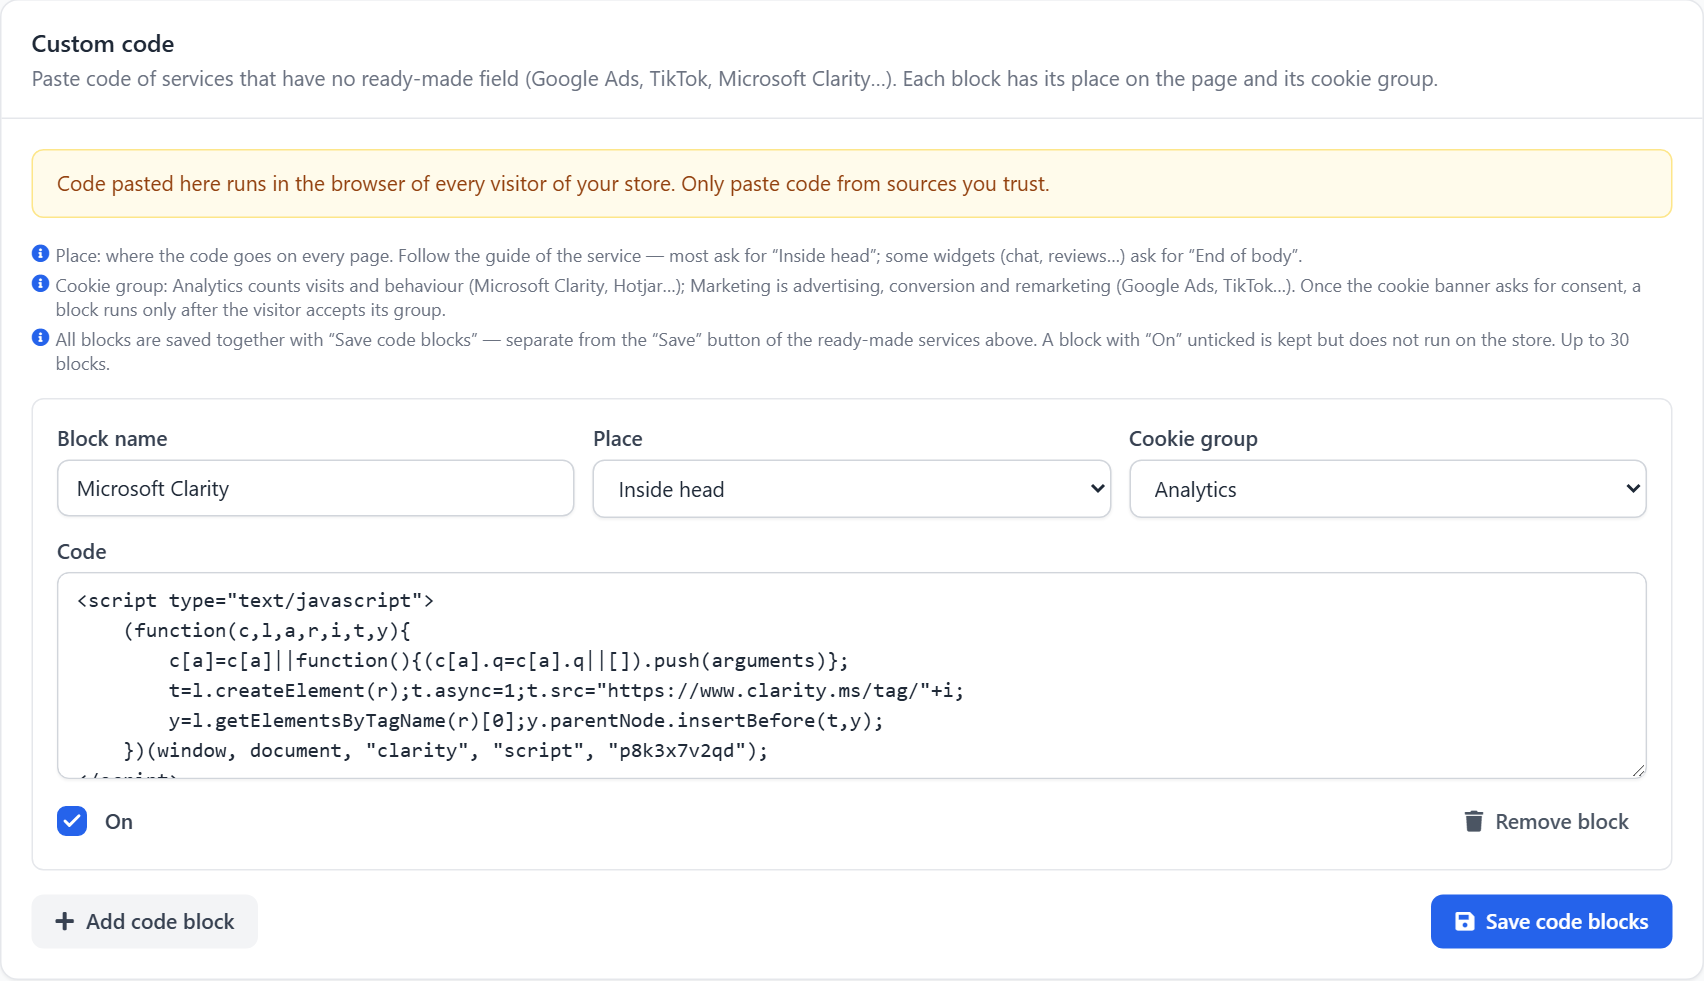
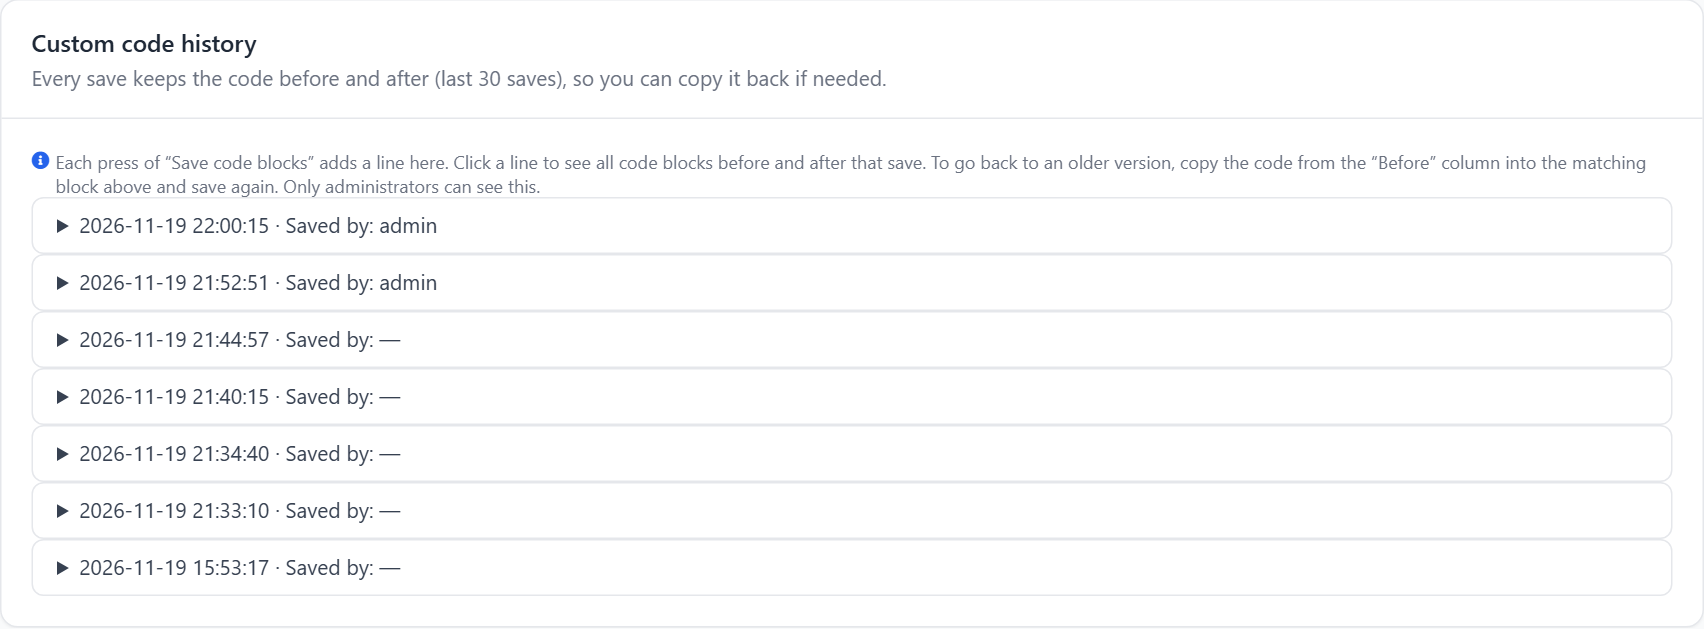
Each Save code blocks adds a line to Custom code history, keeping all the code before and after that save (last 30 saves). To go back to an older version: open the history line, copy the code from the Before column into the matching block and save again.
⚠️ Note: custom code runs in every visitor's browser. Only paste code taken directly from the service's own admin, never code a stranger sends you by message or email.
Turn on the cookie banner
The Cookie banner block decides whether visitors are asked before code runs. Pick the mode by where your visitors live and the law that applies to them.
| Mode | Banner | Analytics / marketing code runs | Fits when |
|---|---|---|---|
| Off (default) | Not shown | As soon as the page opens | Your visitors are not where the law requires consent |
| Notice only | Shown so visitors know | Right away, except groups the visitor turned off | You want to inform visitors and let them opt out |
| Ask first (opt-in) | Shown, visitor must choose | Only after the visitor accepts that group | Visitors in Europe (GDPR) or places with similar law |
- Choose the Banner mode.
- Choose the Cookie policy page: a published content (CMS) page of the store. The banner links to it.
- If you like, edit the Banner text for each language (plain text, up to 500 characters). Leave it empty to use the default sentence.
- Click Save.
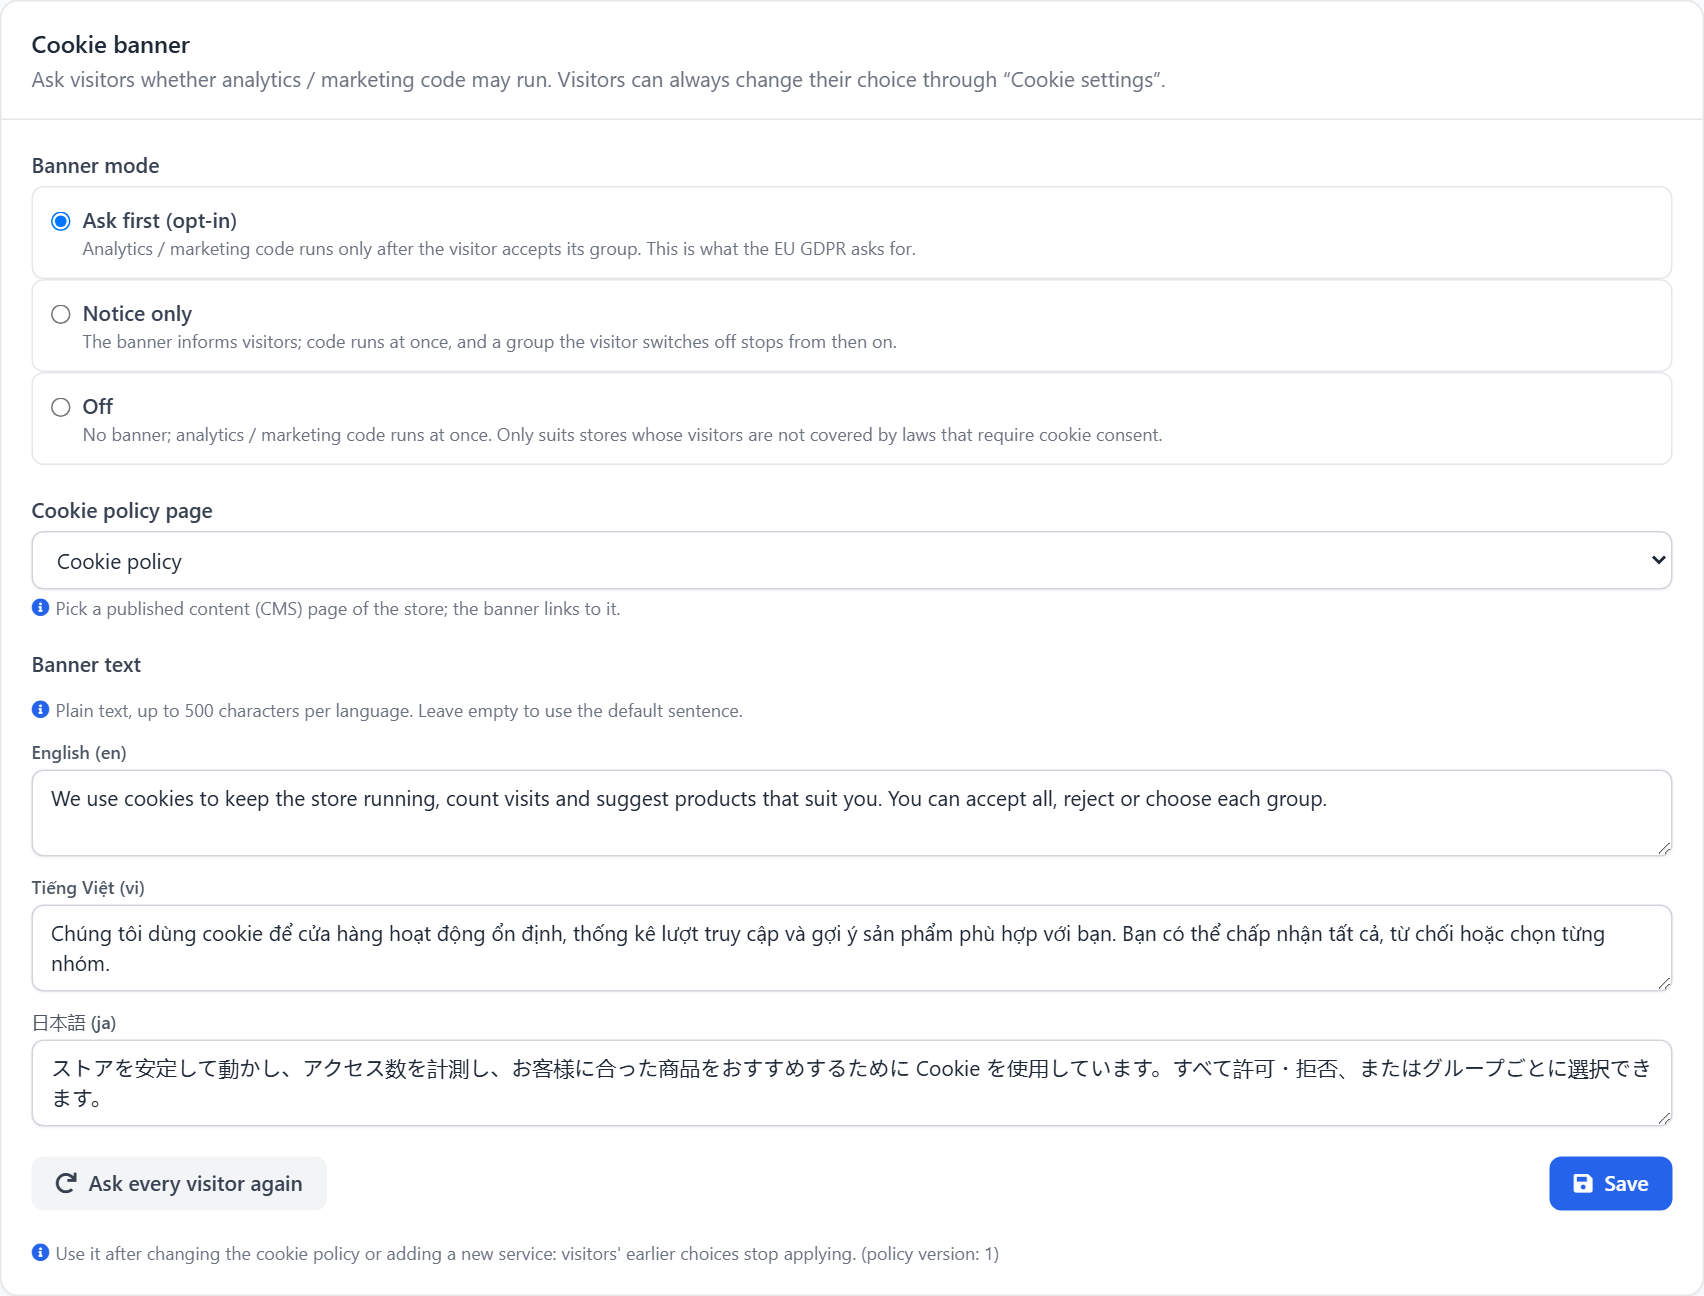
When you change your cookie policy or add a new service, click Ask every visitor again: every visitor's earlier choice expires and the banner shows again for them.
ℹ️ Info: when the banner is Off and the store already has code, the screen shows a yellow warning so you can consider switching to Ask first.
What visitors see on the store
In Ask first mode, a new visitor sees the banner at the bottom of the screen; before they choose, the page does not load any GA4, GTM, Meta or custom code.
flowchart LR
    A["Visitor opens a page"] --> B["Banner shows<br/>3 equal buttons"]
    B --> C["Accept all"]
    B --> D["Reject"]
    B --> E["Customise<br/>each group"]
    C --> F["Code runs at once<br/>no reload"]
    E --> F
- Three buttons of the same size and style: Accept all · Reject · Customise. The reject button is not hidden.
- Customise opens a panel: Necessary (always on) for sign-in, cart and security; Analytics; Marketing.
- The choice takes effect at once, without reloading the page, and is remembered for 6 months in the visitor's browser.
- Visitors can change their mind any time through Cookie settings: a link in the footer (GP247 templates) or a small button at the bottom corner when the template has no such link. Withdrawing a group deletes that group's cookies and stops its code from the next page.
- Google Consent Mode v2 (basic): Google code loads only after the visitor agrees, with consent signals matching the groups the visitor chose.
Sales events sent to GA4 and Meta
Once GA4, GTM or Meta Pixel is set up, the store sends four sales events by itself — nothing else to install. The data comes from the cart / order on the server, in the currency the visitor is viewing.
| When the visitor | GA4 / GTM | Meta Pixel |
|---|---|---|
| Views a product page | view_item |
ViewContent |
| Adds to cart | add_to_cart |
AddToCart |
| Opens the checkout page | begin_checkout |
InitiateCheckout |
| Places an order | purchase |
Purchase |
- Sent only to services the visitor agreed to (GA4 → Analytics, Pixel → Marketing, GTM → the group you chose).
- A purchase is sent exactly once per order: reloading or going back to the thank-you page sends nothing more.
- No personal data of the visitor is sent: no email, phone number, address or name. Only product code, name, category, brand, price, quantity, currency, total and order number.
- Where to see them: GA4 › Reports › Monetization; Meta Events Manager › your Pixel data source.
- Orders created through the REST API, an AI agent or data import do not pass the thank-you page, so they have no purchase event.
Switch off all code in an emergency
If the store is slow, the layout breaks or you suspect unknown code, untick Tracking code on at the top of the screen. All code disappears from the store from the next page; IDs and code blocks are kept, and switching back on runs them as before.
ℹ️ Info: on a site with several stores, switching off on the root store switches off every store; switching off on a sub-store affects only that store.
Warnings in the admin
The System alerts block on the Dashboard (and the php artisan gp247:doctor command) warns you when the setup has a problem:
- The banner is off while code is running — every visitor is tracked without being asked.
- The active template does not call the
meta-headcomponent — the code and the banner do not run on the store. GP247 templates already call it; a custom template must keep the<x-gp247-front::meta-head …>line inside<head>. - A layout HTML block contains
<script>— code pasted in Layout block runs outside the cookie banner. Move tracking code to the Tracking code & cookies screen.
The banner is not legal advice
The cookie banner is a tool that helps you ask visitors; it does not make your store compliant by itself.
- You are responsible for picking the banner mode that fits where your visitors live and the law that applies (for example GDPR in Europe, Decree 13/2023 on personal data protection in Vietnam).
- You write your own cookie / privacy policy page, saying which services you use and why.
- You are responsible for the code you paste and the cookie group you choose for it: the wrong group can let code run before the visitor agrees.
- A visitor's choice is stored only in their own browser; the store keeps no consent log. When in doubt, ask someone with legal expertise.
Conditions & Rules (know before you act)
The limits below keep code from breaking the store or running in the wrong place.
When entering service IDs
- GA4 is
G-+ 4–20 letters / digits; GTM isGTM-+ 4–20 letters / digits; Pixel has only 5–20 digits — a wrong format is not saved, so no data goes to an account that does not exist. - The field's sample text is not accepted (
G-XXXXXXXXXX,GTM-XXXXXXX) — it is an example, not a real ID.
When saving custom code
- The code must have HTML tags (for example
<script>…</script>) — without them the JavaScript would show up as text on every page. - Up to 30 blocks, 100,000 characters per block, 200,000 characters in total per store; block name up to 100 characters — the code is on every page, and too much of it slows the store down.
- There is no "Necessary" group for custom code — code you paste always waits for the visitor's consent when Ask first is on.
When setting up the banner
- Banner text is plain text, up to 500 characters per language — HTML is not accepted, so the banner cannot become a way to inject code.
- The policy page must be a published content page of that same store — typed-in addresses are not accepted, to avoid links to unknown pages. On a site with several stores, each store picks its own page.
Q&A
Q1: I pasted my GA4 ID but GA4 shows no visits?
→ Check the banner mode: in Ask first, visits are counted only after the visitor clicks Accept all or turns on Analytics. Open the store in a private window, accept the banner and look at the GA4 Realtime report.
Q2: Which banner mode should I choose?
→ If you have visitors in Europe or where the law requires consent, choose Ask first. If you only want to let visitors know, choose Notice only. If unsure, ask someone with legal expertise — see The banner is not legal advice.
Q3: I used to paste the GA code into a Layout block. What now?
→ Delete (or turn off) that layout block, then paste your GA4 ID into the Tracking code & cookies screen. Code in a layout block runs outside the cookie banner and may be counted twice.
Q4: If visitors reject, do I lose all my numbers?
→ You lose the numbers of the visitors who reject, and in return the store respects their choice. Visitors who agree are still tracked in full.
Q5: Do I need a plugin to send purchase events?
→ No. Just set up GA4, GTM or Meta Pixel; the four sales events are sent automatically.
Q6: Does my custom code receive the sales events?
→ Not automatically. Events are sent only to the GA4, GTM and Meta Pixel entered in the ready-made fields. To send events to another service, set that service up inside GTM.
Q7: If I change the banner text, do visitors see the banner again?
→ No. The banner shows again for visitors who already chose only after you click Ask every visitor again.
Q8: My template is custom-made. Can I use this?
→ Yes, if the layout calls <x-gp247-front::meta-head …> inside <head>. If it doesn't, the Tracking code & cookies screen and System alerts will tell you.
Q9: What if code I pasted breaks the store?
→ Untick Tracking code on to switch all code off at once, then fix or delete the faulty block. The previous code is still in Custom code history.
Q10: Can I hand the code setup to a staff member?
→ Not through an ordinary permission: only Administrator accounts can open this screen, because the code runs in every visitor's browser.
📅 Last updated: 2026-11-20 · ✍️ Author: GP247